Subwindow Widgets Create your own window components
Although Omnis Studio offers +100 window components, you might find yourself sometimes running against unexpected limitations, or you simply miss the component that fits your needs exactly, or you just want to give your application an individual touch. This article shows, how you can create your own window components with native Studio assets and hopefully will leave you with tons of new ideas. At the bottom you find a link to a demo library with some examples discussed here.
What is a widget?
According to Wikipedia
[...] graphical control elements (GUI "widgets") are examples of reusable modular components that are used together to build a more complex application, allowing programmers to build user interfaces by combining simple, smaller parts.
Speaking of Omnis Studio, what we want are custom window components, that are as easy to handle as the standard entry field. Drag the component into your window, assign a variable and optionally parameters, and you're done. Only a dream? Not necessarily. This article should help you to get started. But first and foremost the only limitation, that applies to the introduced technique at the moment:
The technique shown here does not work within complex grids.
The reason why is that complex grids cannot redraw individual lines but use exceptions instead, while subwindow widgets need to be redrawn after the construct of the main window in most cases. With the great help of TL Germany I issued an enhancement request ST/WO/2311 to fix this limitation.
Used terminology
Talking about windows and subwindows can be confusing. The Main window or Container window is the window, that contains the Subwindow object. There is a subtle difference between Main window and Container window: Main window means exactly $cwind, while a Container window could be itself a subwindow object in another main window. However, in general this difference is not important.
The Subwindow object is the subwindow component you drag into your main window. Its assigned $classname is the Subwindow. This difference is very important. Methods of the Subwindow object are assigned to the component and belong to the main window class, while methods of the Subwindow belong to the Subwindow class. Our mission is to avoid the need of methods in the Subwindow object.
In the code examples, the used prefixes for variables are t, c, i and p as widely used in the Omnis community. To avoid ambiguity however, I prefer 'm' instead of 'l' for local variables ('m' stands for 'method').
Getting started
To get familiar with the used technique, go to TL page and find Omnis Technical Note TNGI0018 Using $dataname in Subwindow fields. This is our starting point, and we will extend it a bit further to make $dataname fully implemented in subwindows.
Basically, as pointed out in TNGI0018, you can assign a variable in the $dataname property of a subwindow object:

The second interesting property is $parameters.
Within the Subwindow $construct method, you can assign this $dataname to e.g. an entry field called Contents with
Calculate $cinst.$objs.Contents.$dataname as $cinst.$dataname
This does a magic trick: Although the subwindow has no knowledge about the variable of the main window, the Contents field will 'blindfolded' reflect its value, and in this aspect acts as if it would be a field of the main window class.
Before we continue, there is one important fact we need to be aware of:
The $construct of the Subwindow(s) is always done before the $construct of the Main window
As we will see later, this has some important implications when we try to access $dataname from within the subwindow.
Labelled entry fields - our first widget*
*Omnis Studio has added this feature to standard entry fields since version 5.01, look at the $contenttip property. Thanks to Kelly Burgess, who made me aware of it. I keep this example however for didactic reasons, because it demonstrates the first step beyond TNGI0018.
A labelled entry field shows its label inside the field, as long as it is empty:

Once you tab or click in, the label vanishes, and if you enter a value, it will be displayed instead of the label:

I really love this widget. Not only, that it is very useful when you have only limited space in your main window, it also does the first step beyond the technique outlined in TNGI0018 and adds an important challenge: We need insight into $dataname (aka the assigned main window variable) within our subwindow, to detect whether the variable is empty or not. Now hold on a minute and think, how you normally would do that.
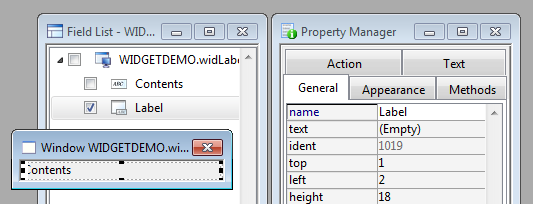
Here we have a view to the window class of our widget. As you can see, it contains two fields - a standard entry field Contents (from now on, we will use this field name in all widgets for the field, that has $dataname assigned), and a shape field Label, placed over it ($order = 2).
Shape fields share the typical fate of interesting Omnis features - their description in the manuals consists of five text lines and leaves you absolutely clueless what they are all about. In a nutshell - shape fields are foreground objects for background objects. If you want a text field or a label acting as foreground object, you would use a shape field with 'kText' as $shape property assigned. And this is exactly what we want here. A background object would be hidden all the time by the entry field Contents, also it would not receive any events.
Basic structure of the widget framework
Before we look at the specific methods of our widget, time for another sidestep. It's a wise idea to give the widgets a uniform structure. Remember, we want a fire and forget solution. Ideally, once your widget works, you never ever will look into it again. However, if you have to, you'll find your way more quickly when all widgets internally look alike. We could use a window superclass for the standard methods, however, since these are only a few lines, it does not really pay the price for the cumbersome handling of window superclasses. Instead, create a template or use the one included in the demo library. I introduce the basic structure here before we continue. The reason for some of the standard methods will not be obvious right from the start, but will be explained later.
The basic structure of the widget framework
Contents
Every widget has a window field named Contents. In most cases, this is an entry field. In the $construct method, $dataname is assigned to Contents. Widgets can use Contents directly, as described in TNGI0018, or only as data transmitter - in this case, Contents is typically set to invisible, and placed somewhere outside the visible part of the subwindow.
Methods
These default methods are part of every widget:
Class Methods
$construct
__containermethod
__redrawmethod
$destruct
$redraw
__dowidget
... (room for custom class methods)
Contents
$event
Basic widget methods
Below are the basic methods. The main widget method is __dowidget, here you would place all the stuff that makes your widget work. The methods $redraw, __redrawmethod and __containermethod will stay untouched in most cases.
The basic methods

$construct
Calculate $cinst.$objs.Contents.$dataname as $cinst.$dataname  ;; assign main window var to Contents
;  Assignment of parameters, if any
Do method __containermethod  ;; generate container methods (explained later)
Do method __redrawmethod  ;; generate redraw method (explained later)
Do $cinst.$redraw() ;; sometimes necessary, when Contents is used directly

$redraw
Do default ;; Important to do this first!
Do method __dowidget ;; draw/refresh the widget
; Note: if not mentioned otherwise, $redraw always looks like that

__dowidget
; widget specific redraw. This is separated from $redraw, so it can be called
; from other methods without redrawing the full subwindow
That's all. What's inside __containermethod and __redrawmethod, will be revealed later.
Methods of Labelled entry field
Now that you know the basic widget layout, let's look into the specific methods of our labelled entry field:
Methods of Labelled entry field (basic version)

$construct
Calculate $cinst.$objs.Contents.$dataname as $cinst.$dataname
Calculate $cinst.$objs.Label.$text as $cinst.$name
;  we simply take the field name from the main window field as label text here
;  in the advanced version, we'll pass it as parameter

;  Do method __containermethod  ;; not necessary here so we comment it out
Do $cinst.$redraw() ;; necessary in this case, as Contents is used directly

$redraw -> default layout

__dowidget
;  Here comes our first trick: using $cinst.$objs.Contents.$contents,
;  we can peek into the contents of the main window variable! Now that's cool ;)

If isclear($cinst.$objs.Contents.$contents)  ;; main win var is empty
  Calculate $cinst.$objs.Label.$visible as kTrue  ;; so show the label
Else
  Calculate $cinst.$objs.Label.$visible as kFalse ;; otherwise, hide it
End If
;  yes, we could do that with a one liner.

Contents.$event
On evBefore
  Calculate $cinst.$objs.Label.$visible as kFalse
On evAfter
  Do method __dowidget  ;; no need for a full redraw, just check main win var

Label.$event
;  in case the user clicks into the field, and it is empty so that
;  Contents is hidden by Label, we need to react
On evClick
  Calculate $cinst.$objs.Label.$visible as kFalse
  Queue set current field {Contents}  ;; avoid that the cursor jumps elsewhere
We are finished. With just a handfull of code lines, we've made our first fully working widget!
Using our widget
Should you have followed the progress in Omnis manually, you can now test your widget. Don't forget to assign the $issubwindow property to the subwindow class. The widget then will be available under the 'Subwindows' tab in the component store. If you just kept reading, you might want to download the demo library, and use the subwindow widLabelledEntry.
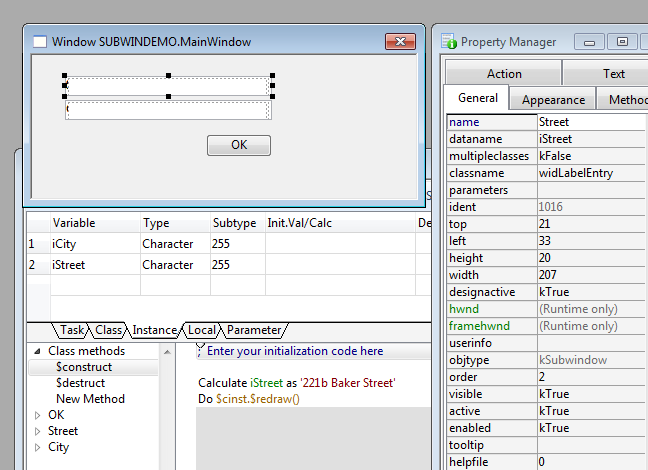
Now create a new window class, add the instance variables iStreet and iCity, drag a push button and two labelled entry field widgets as subwindow objects into it, and name them 'Street' and 'City'. Assign iStreet and iCity as dataname. The push button is just there to have focus when the window opens, so give it the order = 1.
Note: the wigdet that comes with the demo library is more advanced, so some methods will look different as shown here.
In the $construct of the main window, assign a value to iStreet and leave iCity empty, to test the behavior of the widget. Now open the window:
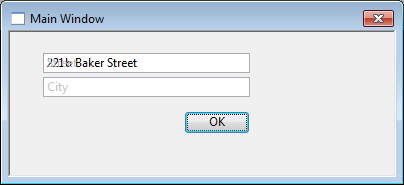
While City looks ok, there is something wrong with Street - both the field and the label show up. This is an important lession and gives us fundamental insight into how subwindows work. As we learned in the beginning, the subwindow is always constructed before the main window, so during its construction, $cinst.$objs.Contents.$contents - our trick to peek into the variable of the main window - does not work, because it is still empty (the only exception would be, if we would have assigned the value of iStreet already in the declaration of the variable).
But why is iStreet displayed then? The answer is, that our assignment of $cinst.$dataname to $cinst.$objs.Contents.$dataname tells the main window, where to display the value of iStreet, and this is done during its $construct. This actually is the core of my enhancement request. You cannot change the $construct order, however the main window maybe could provide the contents of dataname as additional property to the subwindow object in advance, or automatically redraw subwindow objects when it detects they have a dataname assigned at the end of its construction. TL hopefully will look into it, because it also should solve the complex grid problem.
To access the missing $contents, for the moment we need to redraw the widgets after the construction of the main window. The easiest way to do this is sending a $redraw message to all window objects, so add the following line to the $construct method of the main window:
Do $cinst.$objs.$sendall($ref.$redraw())
In the most cases, this will not cause any performance issues, however you can refine the sendall command by limiting it to subwindows. Also, don't forget that objects within container objects need to be addressed as part of the container:
Do $cinst.$objs.PagedPane.$objs.$sendall($ref.$redraw(),$ref.$objtype=kSubwindow)
Although the $redraw issue is not a real showstopper, it is annoying. We will see later, what we can do about it.
Summary
This was a long chapter, but you learned a lot about the widgets technique and how they are used. The summary below is a quick reference as reminder.
1. Every widget has a field named Contents, that holds the dataname of the main window variable
2. Calculate $cinst.$objs.Contents.$dataname as $cinst.$dataname assigns the main window variable to Contents
3. The widgets should have a uniform structure
4. We can access the contents of the main window variable with $cinst.$objs.Contents.$contents
once the widget has been redrawn after the construction of the main window
5. Hence, every widget that wants to access the contents of dataname must be redrawn
6. At the moment, widgets don't work within complex grids.
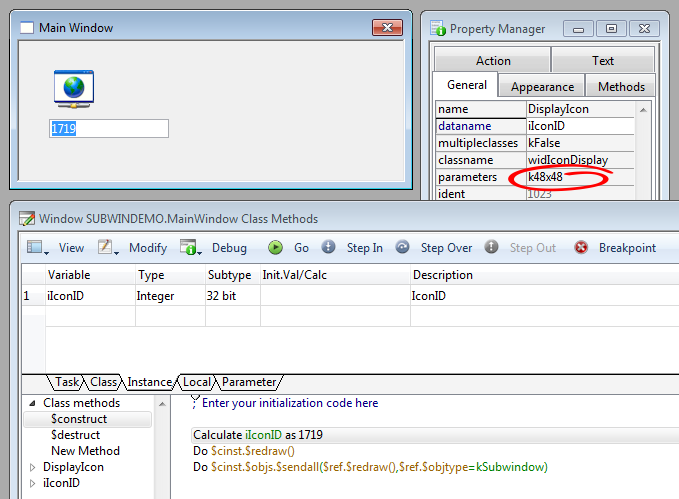
Icon Display widget
Our next widget probably demonstrates the most typical use for this technique: The graphical (or somehow otherwise processed) representation of a field value. It can be as simple as displaying an icon for a given icon ID value (something Omnis Studio does not offer natively), or something like a complex astronomical calculation as our Lunar Phase example will show.
The basic difference to the labelled entry field is, that we do not display the Contents field anymore. It just acts as a view to the main window variable, but itself stays hidden behind the scene. We achieve this by placing it either outside the visible area of the subwindow, and/or setting the $visible attribute to kFalse.
There are a couple of ways in Omnis Studio to display an icon, I'm using a text background object because it offers true transparency. We could use a shape field here as well, however it would trap the click event within our subwindow, something you might want to happen if the widget is designed for a specific task. However, in general it is better to trap the click in the subwindow object of the main window for generic use, so a background object makes more sense here.
Methods of Icon Display
The methods are pretty much straight forward. In addition, Icon Display shows the use of $parameters, where you can set the wanted size of the icon with the constants k16x16, k32x32 or k48x48. The $redraw method looks like pointed out above.
$construct (pDefSize 32bit)
Calculate iDefSize as pDefSize ;; DefSize can be passed as parameter
Calculate $cinst.$objs.Contents.$dataname as $cinst.$dataname ;; as always
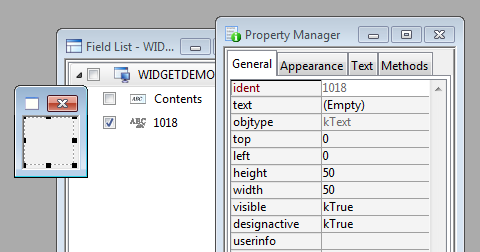
__dowidget
Calculate mIconID as $cinst.$objs.Contents.$contents ;; fetch contents of $dataname
Calculate $cinst.$bobjs.1018.$text as style(kEscBmp,mIconID+iDefSize) ;; assign to text bobj
For more clearity, an intermediate local variable mIconID is used. You of course could assign $cinst.$objs.Contents.$contents directly to the background object.
Using Display Icon
We drag the widDisplayIcon subwindow into our main window, and assign iIconID as dataname and k48x48 as parameter:
To test the behavior of the widget, we add an entry field in the main window, again with dataname iIconID. In the $construct method, we assign a valid icon ID to iIconID, and redraw the widget. In the evAfter event of the field iIconID we do the same (so a better place for redrawing the widgets would be the $redraw method of the main window, and just issue a $cinst.$redraw in the $event method of iIconID).
The proper icon should come up when you open the window, and the entry field lets you assign any other icon ID.
The Lunar Phase widget
Calculating the moon phase for a given date/time value is an example of a more complex widget. It calculates the illuminated fraction of the moon and the phase angle, and displays a matching icon for it. Like the Icon Display wigdet, you can set the icon defsize as parameter.
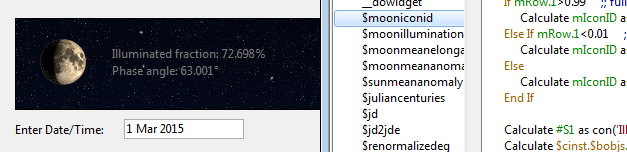
If you are interested into the details, just look at the documented methods. The algorithms were taken from the famous book Astronomical Algorithms by Jean Meeus, ISBN 0-943396-35-2.
Summary
1. The Contents field can be set to invisible or outside the visible area of the widget, if you don't want
to display the field value but a calculated (typically a graphical) representation.
2. We can pass parameters to the $construct method of the subwindow using the $parameters attribute
in the subwindow object.
Two way communications
What we have done so far, was reading the contents of the main window variable, and reacting to it. This already has great potential, as we have seen. But if we could change $contents and write it back to the main window variable, the possibilities for widgets would be endless.
However, when you assign a new value to $cinst.$objs.Contents.$contents, you'll find out that it has no impact on the value stored in the main window variable; $contents obviously is only an independent copy, and passed by value, not by reference.
The blackbox principle
So is this the end of our journey? Yes, when we stick to the technique pointed out so far. Looking at our primary goal however, the idea was to create fire-and-forget widgets with the handling simplicity of an entry field. Writing $contents back to the main window variable requires a custom callback method in the subwindow object of the main window, where Action passes the newly generated value as parameter:
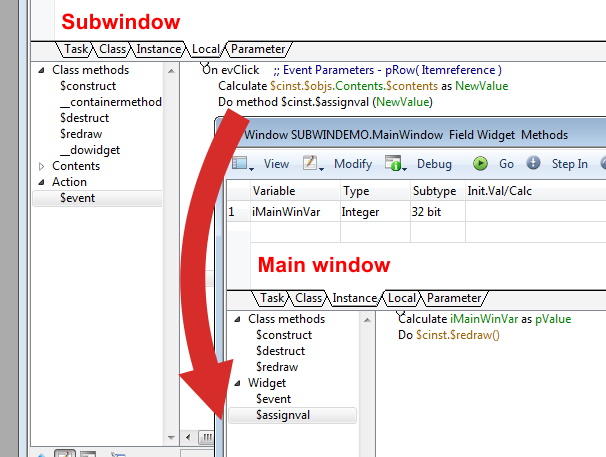
The custom callback method $assignval then can write it into the main window variable, as it is located in the main window itself.
Now, this is something that certainly requires extra efforts we wanted to avoid - remember we were already not too happy about the $redraw issue. But what if we generate the callback method dynamically? In this case, we need to generate a method that passes the new value back to the main window as parameter - and this is what exactly happens in __containermethod:
__containermethod

;  generates a virtual callback method in the container window
;  this is necessary for a 2-way communication

Set reference mWinRef to $cinst.$methods  ;; methods of the subwindow object (!)
Do mWinRef.$add('$assignval') Returns mMethodRef  ;; the method name is '$assignval'

;  the parameter needs to be adjusted to match the type of $dataname
;  in most cases however, you can use a character type with e.g. 255 characters
Do mMethodRef.$lvardefs.$add('pValue',kCharacter,kSimplechar,255,kTrue)  ;; value

Do mMethodRef.$methodlines.$add(con('Calculate ',$cinst.$dataname,' as pValue'))  ;; method text
Do mMethodRef.$methodlines.$add('Do $cinst.$redraw()')  ;; in case you want/need to redraw the main window
Set reference mWinRef to $cinst.$methods - now this is a very remarkable line and the jewel of our trick. Why does it refer to the methods of the subwindow object rather than the methods of the subwindow? The answer is, that there is no subwindow instance aside from the instance of the main window. The subwindow instance only exists as object within the main window, so $cinst.$methods refers to the subwindow object as the only existing representation of our subwindow.
We successfully have established a two way communication by using a virtual callback method - it only exists during the lifetime of the window instance, while the window class stays untouched. This the blackbox principle - we don't care about how the widget alters the contents of the main window variable, as long as the job gets done and we are not involved.
The virtual method $assignval looks like that (in case you want to know it - it stays invisible):
$assignval(pValue)

Calculate [Name of main window variable] as pValue
Do $cinst.$redraw()
The redraw of the main window after assigning the new value to the main window variable is not always necessary - in this case, comment the last line out in __containermethod.
The Planets widget
This widget is not really meaningful, however demonstrates the technique above. You can select a planet from the popup list, and its name is written back into the instance variable of the main window.
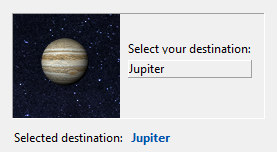
The method $assignval is called at the point where the new value is generated, in this case the popup list:
On evClick
  ;  assign new icon
  Calculate $cinst.$bobjs.1017.$text as style(kEscBmp,cList.cIconID+k48x48)
  ;  send new value to the main window object.
  Do $cinst.$assignval(cList.cPlanet)
In this case, it is not necessary to assign cList.cPlanet to $cinst.$objs.Contents.$contents, because Contents is not displayed in the widget, and its value not used for calculations. The planet name with the blue font is outside the widget and part of the main window.
Summary
1. To establish a two way communication, we generate a virtual callback method.
Seen as a blackbox, the widget now has full access to the main window variable and can write values into it.
2. To write the new value, issue a Do $cinst.$assignval(NewValue) at the point,
were the new value is generated.
Improvements
The redraw issue
As you remember, we need to redraw all widgets after the $construct of the main window to get access to the contents of $dataname. The idea of generating methods on the fly can also ease our redraw issue, when we add an according method line to the $redraw method of the main window dynamically. For this, we introduce a new standard method __redrawmethod, that is called in the $construct method of the subwindow:
__redrawmethod

Set reference mWinRef to $cwind.$methods
Do mWinRef.$add('$redraw') Returns mMethodRef  ;; not executed when method already exists

If isclear(mMethodRef)  ;; $redraw method exists
  Set reference mMethodRef to mWinRef.//$redraw//  ;; set reference to $redraw method
Else  ;; no $redraw method exists
   ; to avoid unwanted effects, we start the $redraw method with 'Do default':
   Do mMethodRef.$methodlines.$add('Do default')
End If

Calculate mText as con('Do ',left($cinst.$fullname,len($cinst.$fullname)-6),$cinst.$name,'.$redraw()')
Do mMethodRef.$methodlines.$add(mText)  ;; issue text of generated method line
Note that we now refer explicitely to the main window as $cwind. When no custom $redraw method is defined, we generate it, otherwise we append the according method line. Other than __containermethod, that adds a callback to the subwindow object, changing the $redraw method can have unwanted side effects. In general it is safe, however if you added a custom $redraw to your main window, make sure that it does not use 'Quit method' so that the added method lines are executed.
You now can redraw all widgets with Do $cinst.$redraw() in your $construct method of the main window independent from their possible container locations, and also in occasions were you need to update the value stored in $datapath. To avoid flickering, remove the 'Do default' command in the $redraw method of your widget:
Do default
Do method __dowidget
In the end, you will find this technique very convenient, so in the demo library it is used, too.
Improving Labelled entry fields
A nice improvement, that is easily implemented, is adding a leading icon to the label text:

All we need to do is to pass an icon ID as parameter, that is received in the $construct method of the widget as pIconID, and assigned to the $text of our shape field:
Calculate $cinst.$objs.Label.$text as pick(pIconID>0,mLabelText,con(style(kEscBmp,pIconID+k16x16),' ',mLabelText))
Furthermore, you might want to pass the label text as parameter as well, if you have a naming convention for window fields, that does not fit for label texts.
Another improvement is to work around the missing evAfter detection of the subwindow object. We sometimes want to check the entered value for validation or other reasons (the Address widget of the demo library shows such an example). Subwindows do not trap an evAfter event, so what we simply are doing is to call a custom method $evafter from the $event method of Contents:
On evAfter
  Do method __dowidget
  ; now call the custom event trapper in the subwindow object inside the main window
  Do $cinst.$evafter
$evafter is an optional method you can add to your Labelled entry field subwindow object, were you now can check what the user has entered. If you do not add this method, the widget creates a dummy to avoid an error condition. The generation procedure is located in __containermethod, as it is not used otherwise in labelled entry fields:
Set reference mWinRef to $cinst.$methods
Do mWinRef.$add('$evafter') Returns mMethodRef  ;; not executed when method already exists
Labelled entry fields are nice widgets for experiments - you might want to try a different border- or background color while the field is entered, and so on. Remember, you now can design window components exactly as you want.
A note to Mac users:
The demo library was developed under windows. I had a quick glance at it on a MacBook and noticed a strange behavior when switching between empty labelled entry fields. It works fine as long as you tab through the fields, however when you click with the mouse, the label text does not reappear on the field left. The evAfter event however is trapped fine, so either it is a bug with the Mac version (Omnis Studio 6.1) or weird Mac default behavior.
Another strange thing is that a border is drawn around the Contents field although $effect is set to kBorderNone.
Final note
We started with TNGI0018, and learned how to inspect the value of the main window variable within our widget's subwindow. The next step was to hide the Contents field away, and display a graphical representation for its value. Finally, we even changed the value of Contents and developed a framework to send it back without the need of callback methods (At least from the blackbox viewpoint. It's like Quantum Mechanics - you may do everything you want as long as it is not detectable) by using virtual callbacks that only exist during the life of the opened window instance. Eventually, we also solved the $redraw issue, reducing it to a single Do $cinst.$redraw() in the construct method of the main window - that's all what the window needs to contribute to make the widgets work.
Below is a real world example from my application that might inspire you. The widget lets you select a country and returns its ISO code, and vice versa displays the flag and the full name of the country for the ISO code set in $dataname - a very common need in applications.
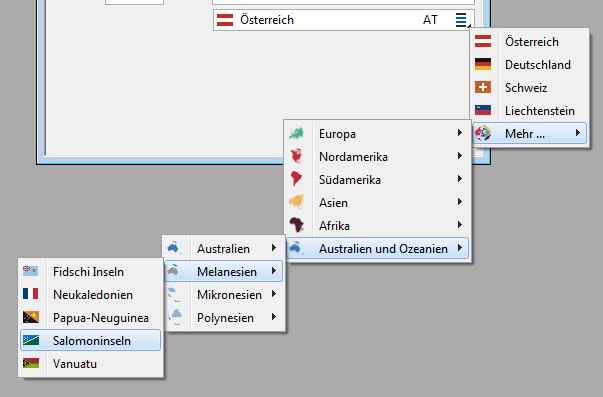
There is of course a lot more behind this widget, like a country object and the cascade menus, that are independent structures. However, it is a perfect example of how you can focus several components of your library into one powerful window object and reuse it like a native Omnis Studio resource wherever needed. And this is what widgets are all about - your own extension of window components you actually need in your application.
Below you find the download links for the demo library for Omnis Studio 6.1 and for Omnis Studio 4.3.1 non unicode, that should work with all versions above, too. It contains the examples discussed here, and a documented template with the widget framework.
Enjoy ;)
Mischa